Adopting 3D Touch: Peek and Pop
09/17/2015 § 7 Comments
Today’s subject is 3D Touch, the new feature introduced on iOS 9 and so far available only for iPhone 6s and 6s Plus.
You can picture it as a tap and hold gesture that takes pressure into account. But more than that, it provides a very specific user experience around it, which turns it into a new way to interact with your iPhone. In addition to that, 3D Touch also enables your app to anticipate and accelerate the user interaction with your app by providing shortcuts or deep links to your app’s features from the Home Screen.
3D Touch is currently available in 3 different ways:
- Home Screen Quick Actions: You can define static and dynamic actions that appear right on your app’s icon in the Home Screen.
- Peek and Pop: This is an in-app application of 3D Touch with the intention of displaying a preview of some content you have available within your app without forcing the user to change scope, while also provide the ability of taking actions on that content.
- Pressure Sensitivity: This is another in-app feature that allows you to leverage pressure-sensing for completely custom purposes, such as drawing applications.
This post will go over Peek and Pop. But before we dive into it, I would like to comment on the difference between 3D touch and Force touch.
The force touch was originally introduced on Watch OS 1. It enables you to display a context menu on a controller upon a force touch, that is, a simple tap with additional pressure. The 3D Touch is the manifestation of the force touch on iOS. It not only provides you APIs for displaying a context menu (or peek in iOS terminology), but it also provides you means to consider the pressure applied on a touch to build completely custom and new features, effectively adding a third dimension to your gestures (traditional x, y coordinates as well as the pressure variant).
Additionally, the 3D Touch is highly related to the long press gesture. The Peek and Pop usage for example (yes, the topic is finally being introduced), happens on three phases.
To better understand these phases we need first to have the use case for Peek and Pop very clear. You wanna leverage Peek & Pop anytime you could display a quick view of some content you have available, without taking the user to some other place in your app. The most common example are UITableViewControllers. Typically your table view lists the contents you have available and tapping on a cell shows the user details about that content, usually navigating to another UIViewController.
If you think taking a peek before effectively transitioning to the detail view has value for your users, that is when you leverage the Peek and Pop APIs.
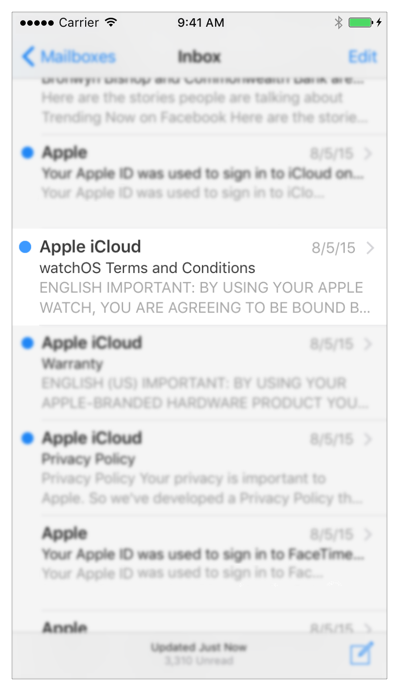
A light press on a cell will trigger the first phase of the 3D Touch. It will blur the surrounding content but not the cell pressed by the user, as an indication the peek functionality is available for that row (or content):

Indication of peek availability from 3D Touch Official Documentation
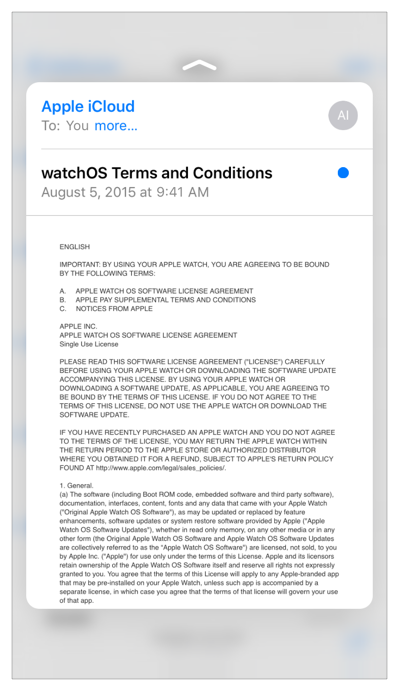
If the user continues to press, the view transitions to show a peek. This is a UIViewController you provide as a preview of the content you would display if the user navigated forward.

Peek from the Official 3D Touch Documentation
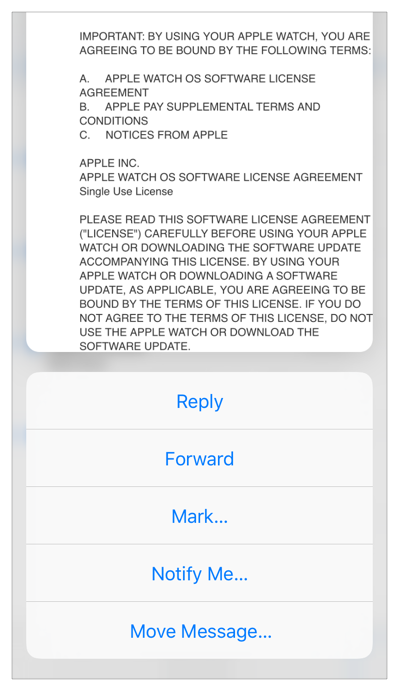
At this point, the user can swipe upwards to see a list of actions available for that content from the preview view, or keep pressing to effectively navigate forward into the details for that content or simply stop pressing the screen which will dismiss the peek effectively returning the app to it’s normal state. This is the third phase.

Peek quick actions from the 3D Touch Official Documentation
Adopting this functionality is very easy. Apple introduced on iOS 9 some new APIs for this purpose. You start with registering a view which you want to display a peek for and a delegate which will handle the transitions for the 3D Touch. You do this by invoking registerForPreviewingWithDelegate:sourceView: on your current UIViewController (or UITableViewController in this example). You can designate more than one source view for a single registered view controller, but you cannot designate a single view as a source view more than once.
Note that for our UITableViewController example, you don’t need to call registerForPreviewingWithDelegate:sourceView: for each cell. That would be a bit complex as you need to consider that cells are re-used. It is much simpler to set your sourceView as your UITableViewController’s view and set the sourceRect on the UIViewControllerPreviewing object that is returned by that call, to convey what row will not be blurred upon a light press. We will get to that later.
 - (void)viewDidLoad {
     [super viewDidLoad];
     self.previewingContext =
      [self registerForPreviewingWithDelegate:self
                                   sourceView:self.view];
 }
That is really all you need to do to handle registration. You don’t need to call unregisterForPreviewingWithContext: unless it is no longer possible to provide a peek for some reason. The system calls this method automatically when a 3D Touch-registered view controller is deallocated.
Note that we saved a reference for the previewing context object (UIViewControllerPreviewing). The reason is that 3D Touch is a feature that not only is available just for two devices, but also because a user can at any time disable or enable it from the Settings app. To do so a user needs only to go to Settings > General > Accessibility > 3D Touch and toggle a switch.
So before registering we need to know whether 3D Touch is available/enabled or not. We do that by checking the forceTouchCapability flag available in the UITraitCollection. Additionally, if your app supports versions older than iOS 9, you need to check for that APIs availability as well.
- (BOOL)isForceTouchAvailable { BOOL isForceTouchAvailable = NO; if ([self.traitCollection respondsToSelector: @selector(forceTouchCapability)]) { isForceTouchAvailable = self.traitCollection .forceTouchCapability == UIForceTouchCapabilityAvailable; } return isForceTouchAvailable; }- (void)viewDidLoad { [super viewDidLoad]; if ([self isForceTouchAvailable]) { self.previewingContext = [self registerForPreviewingWithDelegate:self sourceView:self.view]; } }
I mentioned earlier that a user can at any time toggle the 3D Touch availability switch. When that happens traitCollectionDidChange is called.
- (void)traitCollectionDidChange:(UITraitCollection *)previousTraitCollection {
    [super traitCollectionDidChange:previousTraitCollection];
    if ([self isForceTouchAvailable]) {
       if (!self.previewingContext) {
          self.previewingContext =
             [self registerForPreviewingWithDelegate:self
                                          sourceView:self.view];
       }
    } else {
       if (self.previewingContext) {
          [self unregisterForPreviewingWithContext:self.previewingContext];
          self.previewingContext = nil;
       }
  }
}
Once you have that set, your view controller is ready to display peeks. We just need to implement the UIViewControllerPreviewingDelegate, where you provide iOS a view controller for the peek as well as define the behaviour for the scenario where the user decided to commit with content and effectively dive into it.
The UIViewControllerPreviewingDelegate protocol counts with two very important methods. The first is previewingContext:viewControllerForLocation:. This method is where you find out whether or not you have a peek to display to the user and if you do, you return a UIViewController instance which will be presented to the user (as the second screen shot on this post). If you do provide one, you can specify a sourceRect which will not be blurred by iOS upon a light press. If you don’t specify, the blur animation doesn’t happen.
For our UITableViewController example, that method could be implemented as follows:
 - (nullable UIViewController *)previewingContext:(id <UIViewControllerPreviewing>)previewingContext viewControllerForLocation:(CGPoint)location {
    NSIndexPath *indexPath =
       [self.tableView indexPathForRowAtPoint:location];
    if (indexPath) {
       UITableViewCell *cell =
         [self.tableView cellForRowAtIndexPath:indexPath];
       id *content = self.data[indexPath.row];

       YourViewControllerHere *previewController =
         [[YourViewControllerHere alloc] init];
       previewController.content = content;

       previewingContext.sourceRect = cell.frame;

       return previewController;
    }
    return nil;
 }
The second method is called when the user does a deeper press, effectively indicating she/he wants to change context to that content:
 - (void)previewingContext:
    (id <UIViewControllerPreviewing>)previewingContext
      commitViewController:
    (JMDocumentPreviewViewController *)viewControllerToCommit {
    id *content = viewControllerToCommit.content;
    [self presentViewController:viewControllerToCommit
                       animated:YES completion:nil];
 }
Here we are just re-using the same controller we displayed in the preview and opening it on full screen. But you could provide a different UIViewController or even present the view controller in a navigation controller by calling the navigation controller’s showViewController:sender: method.
As for your preview controller, there is nothing special about it. It is a regular UIViewController, it doesn’t need to conform to any special protocols.
Unless you want to leverage the ability to provide some user actions in your peek. That could really be anything a user can do with your content. Share via E-mail for example. Such a feature would allow your user to take a peek on the content, check it out without leaving the current context and share it if it pleases him/her.
To do so, all you need is to implement the previewActionItems getter of your preview view controller. From that method you can return UIPreviewActionItem objects (which are either groups of actions represented by UIPreviewActionGroup instances or simple actions represented by UIPreviewAction instances).
For the sake of completeness we will take a peek into providing UIPreviewActions. The Share action we discussed previously would be added to your preview controller as follows:
 - (NSArray<id<UIPreviewActionItem>> *)previewActionItems {
    __weak YourViewControllerHere *weakSelf = self;
    UIPreviewAction *shareAction =
      [UIPreviewAction actionWithTitle:@"Share"
                       style:UIPreviewActionStyleDefault
       handler:^(UIPreviewAction *action,
                 UIViewController *previewViewController){
      // call a delegate or present the mail composer
    }];
    return @[shareAction];
 }
And that is all you need to leverage this feature and keep your app up-to-date with what is latest on iOS!
There is one additional note I have to share before we call this post done. Apple repeatedly recommends in the 3D Touch Documentation, that you should look into providing alternative ways for your user to access your 3D Touch features when 3D Touch is not available. Not only because the user can disable that functionality, but mainly because 3D Touch is not supported on all devices yet. For example, all the iPads are currently off the scene. The recommendation is to use UILongPressGestureRecognizer as a means to access these functionalities alternatively.
I hope you enjoyed this post and that it helped you get up to speed. Please leave any comments you might have to help people reading this post or to make my writing better as new posts are published.
Thank you!
Awesome post, please keep’em coming 🙂
Awesome [2], I need more.
Awesome [2]
Very well explained.
Unfortunately with iOS 9.0 we can’t use the 3D touch UI’s style for when using UILongPressGestureRecognizer. I was hoping Apple would give a easy way to do that.
Awesome Post Cezar! Keep going!!!
In your example, what exactly is self.previewingContext?
Thanks for the comment!
On the example I gave, the previewingContext is a property of your view controller. It would be declared like this:
@property (nonatomic, strong) id previewingContext;
Everything it’s good explained and the code is really clear, it’s hard to find a good guide of how to implement the Peek and Pop functionalities in Objective-C. Thanks for this tutorial, it’s was so helpful to me!