Automated Testing with XCTest
10/02/2015 § 6 Comments
Apple recently released this great framework for automated tests – integrated with Xcode – and our team finally adopted it. Now, we had some trouble with it at first (and later too :P), so I thought it would be interesting to write a bit about the experience I had and the framework itself, as right now there isn’t much content about XCTest out there.
But before we get to discuss about XCTest, it is really important we touch some basic topics about automated testing in general.
People like to label things and sometimes we end up labelling too much. Tests for instance have many categories. You probably heard a lot about many of them. Being the most commonly known, Unit tests. But you probably heard about Smoke Testing, Confidence Testing, Sanity Testing, Regression Testing, Functional Tests, Non-Functional tests, Integration Tests, Application Tests and so on. Truth is, most of those are the same thing and there is a lot of confusion (or different opinions) about how each one of those (as well as the others out there) are defined or differ.
Unfortunately I am one of those people too (there is no way around that :P) and I have my own opinion on what is what.
So below I provide a definition for these most common test types. That is the definition we will use on this post.
A Unit Test tests a unit. A unit is the smallest piece of software that you can test. Unit tests are supposed to be isolated, that is, each unit test runs independently in such a way they don’t interfere with each other.
However, Apple uses the term “Unit Test” also for tests which leverage the context of the application you are testing. That characteristic can be leveraged to write any kind of test you want, since it provides a more realistic environment for white box testing. The most common ones being “Integration Test” and “Functional Tests”.
The difference between these two is very clear in theory but not so much in practice. Briefly, the Integration Test aims to test how multiple units behave when working together while the Functional Test aims to exercise a functionality.
But the goal here is not to discuss what each kind of test is or whether they are the same or not. But rather provide an understanding that all those tests can be implemented with XCTest, provide you know how the framework works and how it approaches automated testing.
To simplify, we will look into automation testing considering 3 different types of tests (you will see those can be intuitively branched into Functional, Integration, Smoke, Regression Tests and so on):
- Logic Tests: These are tests that verify the implementation of a given class or method in complete isolation. The idea is to validate that provided an input, the method/class will always result in a given output.
- Application Tests: These tests are loaded into an existing application after it finishes loading. Meaning the full application environment is available. This is particularly useful if you are looking for more realistic tests, as the environment is not completely isolated.
- UI Tests: These are black box tests. The only information you have available is what the user sees. In other words, you test the app in the user’s perspective. You don’t have access to the application’s context, that is, you can’t inspect the application state as you would in white box tests (Logic and Application Tests).
The first two types of tests are implemented by creating Unit Test Case files. The third, by creating UI Test Case files.
I think we are good regarding establishing nomenclatures.
API Overview
The API is as strait-forward as they come. The only complaint I have so far is that no sleep-like wait method is available out of the box. If you need that to wait for an animation to complete for instance, you need to implement it yourself.
The fastest way for you to get up to speed, in my opinion, is by watching the UI Testing in Xcode video from WWDC 2015. It is a one hour long video, but it will tell you how the XCTest framework works, give you an overview on the available APIs and present some usage examples.
I don’t think there is much value in discussing the API itself in depth here as there is such a great introductory video and in-depth documentation made available by Apple, but if you are like me, you would enjoy some code snippets, specially on the beginning. Fortunately Apple already provides lots of code snippets in their own documentation and also in the XCTest header files.
So instead, I will focus on making sure you are aware right away of some very useful APIs and list some Tips & Tricks that will certainly prove useful to you:
-
waitForExpectationsWithTimeout:handler: creates a point of synchronization, blocking the test thread until an expectation is met or the timeout expires. Using this API you can create test cases which depend on asynchronous operations, like network requests.
-
expectationForPredicate:evaluatedWithObject:handler: is one of the helper methods that create expectations. This one is special and appears very often on UI tests. It creates an expectation that is fulfilled if the predicate returns true when evaluated with the given object. You use this method when you need to wait for a view to appear or disappear for instance.
- containingType:identifier: returns a new query for finding elements that contain a descendant matching the specification. This method is very useful to find a cell in a table view based on it’s contents.
Tips & Tricks
By now you already know almost everything you need to know to get to writing your own automated tests (if you watched the video I recommended). There are a few more comments I would like to share before I let you go 🙂
- When you create your test target, you don’t need to account for all your application dependencies nor include all source files you want to test in the test target. All you need to do is add your application as a dependency and set the Enable Testability flag to YES in your application’s target. This flag doesn’t take effect on Release builds. If you create a new project, these settings will be set by default.
- The XCTest framework has calls to automate many user actions, but not all. You can simulate a tap (with multiple fingers), a double tap, long press, swipe and typing (in text fields). The UIView’s accessibilityActivationPoint property is used by the system to define where in your view (x,y coordinates) the interaction is going to happen. By default accessibilityActivationPoint points to the center of your view.
- You rarely need to write complex queries. That is, app.buttons[your button ID] will always succeed in finding the button with that ID even if that button is placed deep in the view hierarchy (i.e.: within a UITableViewCell displayed on a popover). Avoid complex queries to keep your code easy to understand and maintain.
- The UIView’s accessibilityIdentifier was created with the purpose of uniquely identifying an interface element in UI Automation tests. Use that property instead of the accessibilityLabel. That will help you keep the code simple, independent from the current language set and won’t affect the UX.
- Create as many XCTestCase extensions as you can. Once you start writing UI tests, you will notice lots of user actions can be re-used to create new test cases. By creating extensions to aid in test development, you can end up having very complex tests written with just a few very legible lines of code!
- As you write your own extensions, handle failures with recordFailureWithDescription so your test fails where the APIs are called instead of within the frameworks you wrote. This will help you a lot when a Regression test fails.
- UI Test Cases are a great way to introduce Swift in your professional day-to-day life, because you can learn, experiment and introduce Swift into your project without affecting your application code (your customers and schedule are safe ;).
There is something you should know…
Unfortunately Xcode 7 is very unstable in that regard. You will often see your tests fail, not because they actually failed, but because Xcode couldn’t launch or terminate application, or because the application was launched but the launch parameters were not delivered or simply because it couldn’t attach to the process – don’t forget infamous FBSOpenApplicationErrorDomain error 1 – .
So be prepared to have some headaches when working on UI testing. But more importantly, take that into consideration when planning a Continuous Integration set up with Automation Testing using XCTest.
About this post
If you have any comments, please share. Also, if you feel like I should have touched (or elaborated) a specific subject or topic, don’t hesitate to ask. I will consider writing about it!
On Demand Resources
09/18/2015 § 4 Comments
On Demand Resources (ODR) is an iOS 9 feature that enables applications to host resources on a remote server while using those as if they were bundled within the app. It allows applications to considerably reduce their binary size and still offer high speed, high quality content.
Your application resources are hosted by the App Store if your app is published, but those can also be hosted on custom web servers if your application is signed with an Enterprise Profile. As for the development stage, Xcode 7 hosts the resources on your local machine. If you are doing Continuous Integration, Xcode Server can also host your resources.
An application can leverage ODR for basically any kind of resource. That includes images, videos, data files and other specific file types such as Apple TV Image Stack files.
It is really important to note ODR is not supported on iOS 8. By unsupported I don’t mean that ODR assets are seen as regular bundled assets on iOS 8, but rather they are not available at all (not even included on the binary). Unfortunately, if you are looking to leverage ODR on your application, you must not support older versions of iOS.
If that is your case, leveraging ODR is really simple. All you need to do is categorize your resources and then tag your categories. Once you’ve done that, there are new API calls which handle the download in your behalf and tell you when the resources are locally available, so you can access them through the very same APIs you already do today.
Of course, we will go over the APIs and such, but those are so simple, I rather first go over topics like what you should expect, think about or be aware of, when integrating ODR in your application.
The first topic in that regard is what files you should use ODR for.
ODR is all about reducing your application’s size, both the binary and footprint. Any resources you don’t need right away or that you don’t need to have always available are good candidates. Specially if those are big files.
Apple likes to use Game apps to exemplify. That is because it is very easy to imagine that a game app doesn’t need all the levels as soon as it is installed. It will also no longer needs the initial levels if the player is far through the game. Any assets needed for those levels can be marked as ODRs. The app will be much smaller because a lot of assets (images, sprites and videos for example) needed for those levels will not be downloaded together with the game, but only when needed.
Another very important detail on the ODRs life cycle that you might have picked up on the last paragraph, is that resources once downloaded, can become unavailable again. The reason is that often you need a given resource until you don’t. In the Game example, those early levels are not required and could be removed once you are past them, to make space for new stuff. That is precisely what iOS does. It tries to keep your footprint as small as possible. But it will only delete files your application downloaded if it needs more space. You should always keep that in mind.
As iOS might delete resources that are not in use, it also allows your application to set a content preservation priority. iOS will use that information to decide which files to delete first. Basically the bigger files that are less important for you will be deleted first.
It is also possible for you to use ODR for resources you do need available as soon as your application installs. iOS will take care of assuming the app as installed only once those resources – you marked as needed upon first launch – are downloaded and available. As you might expect, the file size for these resources counts towards your total app size in the App Store, while other ODR resources don’t. The upside in using ODR for these resources you need right away, is that those might not be needed afterwards. iOS can free that space for you and provide those back if you ever need them again. A good example are welcome videos. Users see these welcome videos when they install your application but after that, they rarely go after those again.
I guess that is enough detail concerning what you should have in mind while working with ODR. Let’s dive into the implementation details!
First thing to do is enable ODR for your project.
Once you’ve done that, you need to create and assign tags for the resources you would like to access via ODR. You do that on your Assets Catalog. In an asset catalog, the field is shown in the Attributes inspector:
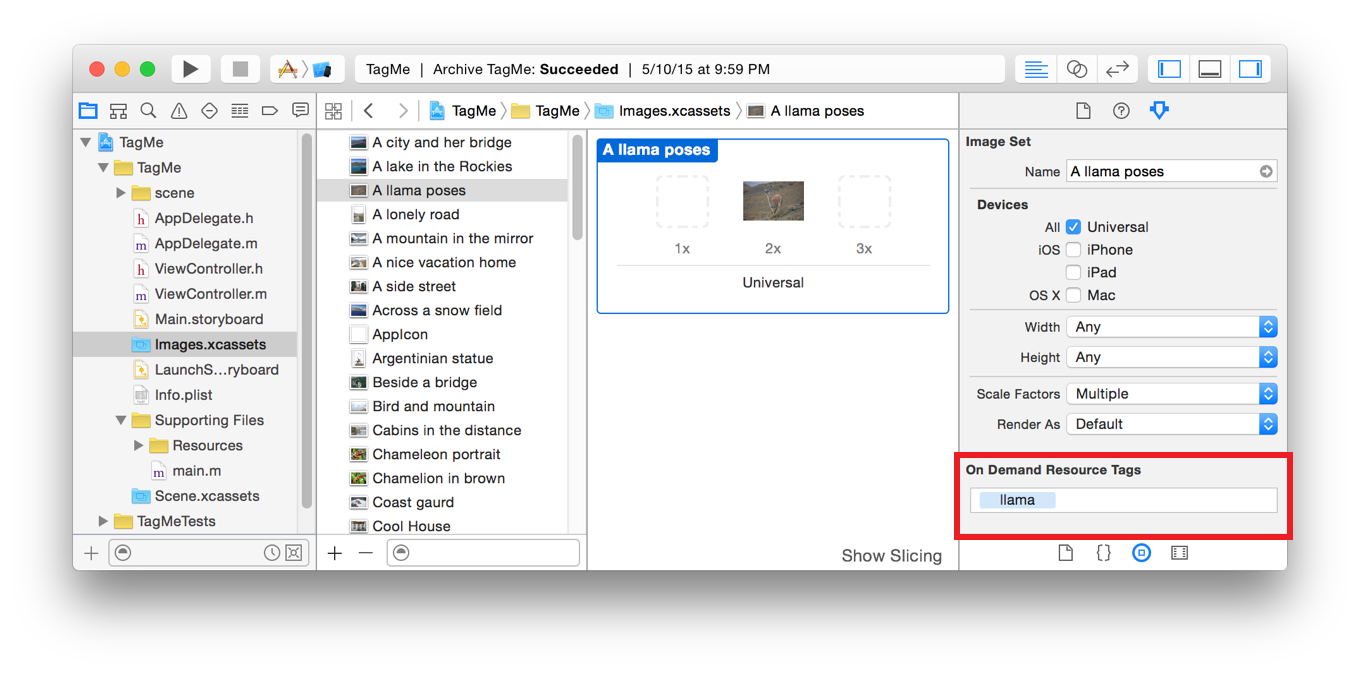
Creating and Setting Tags. Screen shot from Apple’s documentation.
You can also specify tags by typing it’s name in the On-Demand Resources Tags field on your Target settings. If you are looking for having your resources Prefetched, you can set that up on your Target’s Resource Pane. Just assign your tags to either Initial Install Tags or Prefetched Tag Order categories. The first ensures your resources will be downloaded and made available as soon as your app finishes installing, while the second will trigger the download of your resources in the order those were specified, as soon as your app finishes installing.
After that all you need do is request access to the resources you need when you need those. You do that using one of the following two APIs:
- beginAccessingResourcesWithCompletionHandler: This API will download the resource if needed and call the completion block when the resource is available. It will also tell iOS you are currently using the resource and that it should not be deleted by system if it needs extra disk space.
- conditionallyBeginAccessingResourcesWithCompletionHandler: Does not download the resource. The completion block will return immediately with a resourcesAvailable boolean. If the resources are available, those are also marked as currently in use.
One very important aspect of the completion handler (I better bold this) is: The callback block is not called on the main thread. If you are going to do anything UI related, make sure to schedule such operation on the main thread. Within this block (or after it was called) you can access the resources you asked (as long as you don’t have any errors), the same way you did before (i.e: [UIImage imageNamed:]).
Both of these methods are called on a NSBundleResourceRequest instance. To create one you need only to call initWithTags: and provide the tags you want to access.
You should keep reference to the instance of NSBundleResourceRequest you created, so that you can call endAccessingResources once you are done. That will tell the system that you have finished accessing the resources marked with the tags managed by the request, effectively allowing iOS to delete those resources if required from this point forward.
If you don’t call that method, the system will when the resource request object is deallocated.
That reference can also be used to listen for progress updates or cancel the request/download operation or to set the loadingPriority, which tells the system how to prioritise the order of your download requests.
Another topic I should mention before we call this post done, regards error handling. There are really three types of errors you can encounter when dealing with ODR:
- Network related issues: These can be either common networking issues, non-existing resources or asset pack size errors. The last two you should find and resolve during development.
- Local storage issues: These can either be maximum in-use memory exceeded (NSBundleOnDemandResourceExceededMaximumSizeError), which you fix by calling endAccessingResources on resources you no longer need; or a system memory exceeded error (NSBundleOnDemandResourceOutOfSpaceError), in which case you should listen for Low Space Warnings.
- Unexpected state: This kind of error tells you there is something wrong with your state handling. The best way to debug these, is by using the Disk Gauge (there is an icon for that on Debug Navigator) and check out the size and status of each resource.
This should be a pretty good overview/sum-up to get you started right away. If you feel like you need more information, don’t hesitate to check the official documentation.
Thank you!
Adopting 3D Touch: Peek and Pop
09/17/2015 § 7 Comments
Today’s subject is 3D Touch, the new feature introduced on iOS 9 and so far available only for iPhone 6s and 6s Plus.
You can picture it as a tap and hold gesture that takes pressure into account. But more than that, it provides a very specific user experience around it, which turns it into a new way to interact with your iPhone. In addition to that, 3D Touch also enables your app to anticipate and accelerate the user interaction with your app by providing shortcuts or deep links to your app’s features from the Home Screen.
3D Touch is currently available in 3 different ways:
- Home Screen Quick Actions: You can define static and dynamic actions that appear right on your app’s icon in the Home Screen.
- Peek and Pop: This is an in-app application of 3D Touch with the intention of displaying a preview of some content you have available within your app without forcing the user to change scope, while also provide the ability of taking actions on that content.
- Pressure Sensitivity: This is another in-app feature that allows you to leverage pressure-sensing for completely custom purposes, such as drawing applications.
This post will go over Peek and Pop. But before we dive into it, I would like to comment on the difference between 3D touch and Force touch.
The force touch was originally introduced on Watch OS 1. It enables you to display a context menu on a controller upon a force touch, that is, a simple tap with additional pressure. The 3D Touch is the manifestation of the force touch on iOS. It not only provides you APIs for displaying a context menu (or peek in iOS terminology), but it also provides you means to consider the pressure applied on a touch to build completely custom and new features, effectively adding a third dimension to your gestures (traditional x, y coordinates as well as the pressure variant).
Additionally, the 3D Touch is highly related to the long press gesture. The Peek and Pop usage for example (yes, the topic is finally being introduced), happens on three phases.
To better understand these phases we need first to have the use case for Peek and Pop very clear. You wanna leverage Peek & Pop anytime you could display a quick view of some content you have available, without taking the user to some other place in your app. The most common example are UITableViewControllers. Typically your table view lists the contents you have available and tapping on a cell shows the user details about that content, usually navigating to another UIViewController.
If you think taking a peek before effectively transitioning to the detail view has value for your users, that is when you leverage the Peek and Pop APIs.
A light press on a cell will trigger the first phase of the 3D Touch. It will blur the surrounding content but not the cell pressed by the user, as an indication the peek functionality is available for that row (or content):
Indication of peek availability from 3D Touch Official Documentation
If the user continues to press, the view transitions to show a peek. This is a UIViewController you provide as a preview of the content you would display if the user navigated forward.
Peek from the Official 3D Touch Documentation
At this point, the user can swipe upwards to see a list of actions available for that content from the preview view, or keep pressing to effectively navigate forward into the details for that content or simply stop pressing the screen which will dismiss the peek effectively returning the app to it’s normal state. This is the third phase.
Peek quick actions from the 3D Touch Official Documentation
Adopting this functionality is very easy. Apple introduced on iOS 9 some new APIs for this purpose. You start with registering a view which you want to display a peek for and a delegate which will handle the transitions for the 3D Touch. You do this by invoking registerForPreviewingWithDelegate:sourceView: on your current UIViewController (or UITableViewController in this example). You can designate more than one source view for a single registered view controller, but you cannot designate a single view as a source view more than once.
Note that for our UITableViewController example, you don’t need to call registerForPreviewingWithDelegate:sourceView: for each cell. That would be a bit complex as you need to consider that cells are re-used. It is much simpler to set your sourceView as your UITableViewController’s view and set the sourceRect on the UIViewControllerPreviewing object that is returned by that call, to convey what row will not be blurred upon a light press. We will get to that later.
 - (void)viewDidLoad {
     [super viewDidLoad];
     self.previewingContext =
      [self registerForPreviewingWithDelegate:self
                                   sourceView:self.view];
 }
That is really all you need to do to handle registration. You don’t need to call unregisterForPreviewingWithContext: unless it is no longer possible to provide a peek for some reason. The system calls this method automatically when a 3D Touch-registered view controller is deallocated.
Note that we saved a reference for the previewing context object (UIViewControllerPreviewing). The reason is that 3D Touch is a feature that not only is available just for two devices, but also because a user can at any time disable or enable it from the Settings app. To do so a user needs only to go to Settings > General > Accessibility > 3D Touch and toggle a switch.
So before registering we need to know whether 3D Touch is available/enabled or not. We do that by checking the forceTouchCapability flag available in the UITraitCollection. Additionally, if your app supports versions older than iOS 9, you need to check for that APIs availability as well.
- (BOOL)isForceTouchAvailable { BOOL isForceTouchAvailable = NO; if ([self.traitCollection respondsToSelector: @selector(forceTouchCapability)]) { isForceTouchAvailable = self.traitCollection .forceTouchCapability == UIForceTouchCapabilityAvailable; } return isForceTouchAvailable; }- (void)viewDidLoad { [super viewDidLoad]; if ([self isForceTouchAvailable]) { self.previewingContext = [self registerForPreviewingWithDelegate:self sourceView:self.view]; } }
I mentioned earlier that a user can at any time toggle the 3D Touch availability switch. When that happens traitCollectionDidChange is called.
- (void)traitCollectionDidChange:(UITraitCollection *)previousTraitCollection {
    [super traitCollectionDidChange:previousTraitCollection];
    if ([self isForceTouchAvailable]) {
       if (!self.previewingContext) {
          self.previewingContext =
             [self registerForPreviewingWithDelegate:self
                                          sourceView:self.view];
       }
    } else {
       if (self.previewingContext) {
          [self unregisterForPreviewingWithContext:self.previewingContext];
          self.previewingContext = nil;
       }
  }
}
Once you have that set, your view controller is ready to display peeks. We just need to implement the UIViewControllerPreviewingDelegate, where you provide iOS a view controller for the peek as well as define the behaviour for the scenario where the user decided to commit with content and effectively dive into it.
The UIViewControllerPreviewingDelegate protocol counts with two very important methods. The first is previewingContext:viewControllerForLocation:. This method is where you find out whether or not you have a peek to display to the user and if you do, you return a UIViewController instance which will be presented to the user (as the second screen shot on this post). If you do provide one, you can specify a sourceRect which will not be blurred by iOS upon a light press. If you don’t specify, the blur animation doesn’t happen.
For our UITableViewController example, that method could be implemented as follows:
 - (nullable UIViewController *)previewingContext:(id <UIViewControllerPreviewing>)previewingContext viewControllerForLocation:(CGPoint)location {
    NSIndexPath *indexPath =
       [self.tableView indexPathForRowAtPoint:location];
    if (indexPath) {
       UITableViewCell *cell =
         [self.tableView cellForRowAtIndexPath:indexPath];
       id *content = self.data[indexPath.row];

       YourViewControllerHere *previewController =
         [[YourViewControllerHere alloc] init];
       previewController.content = content;

       previewingContext.sourceRect = cell.frame;

       return previewController;
    }
    return nil;
 }
The second method is called when the user does a deeper press, effectively indicating she/he wants to change context to that content:
 - (void)previewingContext:
    (id <UIViewControllerPreviewing>)previewingContext
      commitViewController:
    (JMDocumentPreviewViewController *)viewControllerToCommit {
    id *content = viewControllerToCommit.content;
    [self presentViewController:viewControllerToCommit
                       animated:YES completion:nil];
 }
Here we are just re-using the same controller we displayed in the preview and opening it on full screen. But you could provide a different UIViewController or even present the view controller in a navigation controller by calling the navigation controller’s showViewController:sender: method.
As for your preview controller, there is nothing special about it. It is a regular UIViewController, it doesn’t need to conform to any special protocols.
Unless you want to leverage the ability to provide some user actions in your peek. That could really be anything a user can do with your content. Share via E-mail for example. Such a feature would allow your user to take a peek on the content, check it out without leaving the current context and share it if it pleases him/her.
To do so, all you need is to implement the previewActionItems getter of your preview view controller. From that method you can return UIPreviewActionItem objects (which are either groups of actions represented by UIPreviewActionGroup instances or simple actions represented by UIPreviewAction instances).
For the sake of completeness we will take a peek into providing UIPreviewActions. The Share action we discussed previously would be added to your preview controller as follows:
 - (NSArray<id<UIPreviewActionItem>> *)previewActionItems {
    __weak YourViewControllerHere *weakSelf = self;
    UIPreviewAction *shareAction =
      [UIPreviewAction actionWithTitle:@"Share"
                       style:UIPreviewActionStyleDefault
       handler:^(UIPreviewAction *action,
                 UIViewController *previewViewController){
      // call a delegate or present the mail composer
    }];
    return @[shareAction];
 }
And that is all you need to leverage this feature and keep your app up-to-date with what is latest on iOS!
There is one additional note I have to share before we call this post done. Apple repeatedly recommends in the 3D Touch Documentation, that you should look into providing alternative ways for your user to access your 3D Touch features when 3D Touch is not available. Not only because the user can disable that functionality, but mainly because 3D Touch is not supported on all devices yet. For example, all the iPads are currently off the scene. The recommendation is to use UILongPressGestureRecognizer as a means to access these functionalities alternatively.
I hope you enjoyed this post and that it helped you get up to speed. Please leave any comments you might have to help people reading this post or to make my writing better as new posts are published.
Thank you!
Android Saga: AsyncTask, Advantages and Limitations
07/08/2012 § 2 Comments
This is an utility class available in the Android SDK that abstracts a worker thread. An AsyncTask object can be compared to the NSOperation object from iOS.
The NSOperation object represents an operation of some kind and has to be added to a NSOperationQueue in order to execute. This queue can either be the main queue (UI thread) or another one that you create to execute operations in background. iOS doesn’t schedule an operation if it is not possible, neither throws exceptions when it is not possible to schedule an operation. Instead, iOS waits for the right moment to schedule the operation.
The difference between AsyncTasks and NSOperation lies on how they are scheduled. An AsyncTask is automatically scheduled when the method execute() is called. From API Level 11 onwards, execute() can have some parameters passed in to specify the queue on which to schedule it.
AsyncTask provides a simple API for doing work in the background and re-integrating the result with the main thread. Here’s what it looks like:
new AsyncTask<Param, Progress, Result>() {
 protected void onPreExecute() {
 // do something before the hard work, like tell the user what you are going to do

}

protected Result doInBackground(Param... aParams) {
 // do some expensive work
 }

protected void onPostExecute(Result aResult) {
 // background work is finished,
 // so update the UI here
 }
}.execute();
Both methods onPreExecute() and onPostExecute(Result) are invoked on the main thread, so that you can safely update the UI.
If you would like to show the user progress is being made, there is a fourth template method – onProgressUpdate(Progress[]) – that you can implement to update the UI. Notice that you need to regularly invoke publishProgress(Progress[]) from within doInBackground(Param[]) so that onProgressUpdate can be called for you.
The type variables of AsyncTask you saw in the code above are:
- Params is the argument type for the array passed in to doInBackground.
- Progress is the argument type for the array passed in to onProgressUpdate.
- Result is the return type of doInBackground, which in turn is the argument type passed in to onPostExecute.
When execute(Object.. params) is invoked the task is executed in a background thread. Depending on the API Level AsyncTasks may be executed serially, or concurrently. The only way to be sure is by invoking executeOnExecutor(Executor executor, Object.. params) method instead, and supply an executor. But this can only be done from API Level 11 onward, as I said previously.
This is a very useful abstraction of a Thread/Runnable combination. As it provides the hooks needed to keep focus only on what you application needs to do.
However you must keep in mind that it is not all flowers. If you want to support the vast majority of Android users, you must develop for API Level 8 (currently if you install Eclipse with ADT, ADT will tell you that about 80% of Android users are running API Level 8. I am not sure if this is valid only for Brazil or not. Anyways, even it is only within Brazil, that counts already hundreds of thousands users – Brazilian population is approximately 194 million people).
And API Level 8 doesn’t support executeOnExecutor. API Level 8 AsyncTask supports 10 threads and a work queue depth of 10. In theory, that would support 20 threads if nothing else is using AsyncTask as well. This limitation easily crashes your app if you are using AsyncTask to fetch thumbnails from some remote URL for a list view to present in each row.
If you are consuming a web service, the right approach would be to use a Service instead of a worker thread. So you could use the same service to request the image, store it locally and fetch it somehow from your local filesystem so that your ListActivity can present it. But if you wish to keep things simple and don’t handle image caching at all, the solution is to implement a queue and execute your requests serially.
Personally I think this should be provided by Google in the Support Library. But it isn’t, so the solutions is to copy the newly version of AsyncTask (from API Level 11) into our own AsyncTask implementation and make it work with earlier Android SDK (down to API Level 3). The modified source code is available here.
If you decided to grab that code, you should start using your.package.AsyncTask instead of android.os.AsyncTask, call executeInExecutor(Executor executor) instead of execute() and create your own Executor:
private static final BlockingQueue<Runnable> sWorkQueue = new LinkedBlockingQueue<Runnable>(Integer.MAX_VALUE);

public static final ThreadPoolExecutor SERIAL_EXECUTOR = new ThreadPoolExecutor(1, Integer.MAX_VALUE, 30, TimeUnit.SECONDS, sWorkQueue);
Note: It is important to keep in mind that this alternative works very well (since it doesn’t really matter what API Level your user is running), but it is also considered to be bad practice since you don’t get updates on AsyncTask when a new API Level is released unless you manually apply any changes to your class.
Another thing to keep in mind is that AsyncTasks are there for you to void blocking the main thread, but you have to properly handle them considering the Activity lifecycle and also that your application runs in an environment where users switch contexts frequently and quickly.
For example, if your AsyncTask retains a reference to the Activity, not cancelling the task when the Activity dies wastes CPU resources on work that cannot update its UI, and creates a memory leak. Don’t forget Activities are destroyed and re-created when some configuration changes (ie: device orientation). So these are not edge cases.
AsyncTask is good, but also has its limitations – depending on the API Level – and constraints. Having those in mind, think about your task before coding with AsyncTasks. Maybe they are not the best approach. Maybe they are. And maybe you should grab Google’s code, modify it and use it instead.
Android Saga: Pull to Refresh revisited
06/27/2012 § 3 Comments
Previously on Android Saga..
“I find the solution very bizarre, but it worked out and that is what I am using right now. The only thing that still upsets me, is that the feature is not polished enough. It is still sluggish to pull, flicks once in a while, and lacks animation.”
It happens I was wrong. Yesterday I tested the app on the device – precisely a Samsung Galaxy i5500 running API Level 8 – and I was surprised when it didn’t work since all this time I was testing on an emulator running the very same API Level. I know the emulator is different from the device. This is true for the iOS simulator as well. But not THAT different.
Anyways, Johan’s implementation doesn’t work either on Samsung Galaxy i5500 running API Level 8 nor Samsung Galaxy S2 running 4.0.3 (Yes I tried a newer version to see if I was pushing to hard by using an old API version).
I got to a point where I started to think that maybe pull to refresh wasn’t the answer for Android. Actually my girlfriend asked me if I was not trying to put an iOS app into Android. And she had a good point: Android doesn’t support bouncing in the list view, so Android users are not used to pull the list hence they don’t easily discover how to pull to refresh.
Discussing this matter with some co-workers, I was presented with a list of well known Android apps (Twitter, Facebook, LinkedIn…) that actually do a very good pull to refresh. This convinced me that Android apps can be as good as iOS apps.
So I kept looking for other pull to refresh implementations. In the end, I got to Chris Banes’s library.
This time as soon as it worked on the emulator, I tried on both devices I have here and it worked pretty well. In fact, it is as good as Twitter’s pull to refresh.
Now, the interesting fact is: Chris Bane’s implementation needed 6 Java classes (and they are not tiny), 8 XML files and 2 images. His implementation is very interesting and truly had outstanding results. BUT this is TOO MUCH WORK FOR SUCH A SIMPLE FEATURE!
Knowing there are developers and developers (although this guy deserves respect since he is the only one that got a – open source – pull to refresh to properly work on Android), I tried not to think: “On iOS it would take a class for the header view and another to use it. Really.”.
Instead I googled for the Twitter APK file, downloaded it and decompiled it (a pretty painful process – by the way – that requires decompressing the APK, converting smil files to dex, from dex to jar and finally to Java source files). Of course, I wasn’t able to just grab and use their implementation, but that was enough readable code to see that they use just about the same number of files that Chris Bane’s does.
I am sure every file has its meaning and need, but still too much work for this feature. And just to be sure we are in the same page, I am not counting any i18n files neither assets for supporting multiple screen densities whatsoever.
Anyways, I learned two things on all of this:
1. Android apps can be as good as iOS apps
2. #1 requires a lot more work than it takes on iOS (and I am not talking about device fragmentation)
For those that like references, here are the best pull to refresh libraries I tried on Android:
https://github.com/chrisbanes/Android-PullToRefresh
https://github.com/johannilsson/android-pulltorefresh
https://github.com/woozzu/RefreshableListView.git
https://github.com/erikwt/PullToRefresh-ListView
And the tools I used for decompiling Twitter:
http://code.google.com/p/android-apktool/
http://code.google.com/p/smali/
http://code.google.com/p/dex2jar/
http://www.varaneckas.com/jad/
